Accessing Raw Capacitive Images on Commodity Smartphones
The majority of recent smartphones and tablets use mutual capacitive touchscreens as the main interface for input and output. While mobile operating systems such as Android and iOS solely provide the 2D touch coordinates, touch controllers sense more information that are useful to design and develop novel interaction techniques. Some of my own research work and other projects that I supervise use the raw measurements of capacitive touchscreens which are often referred to as capacitive images.
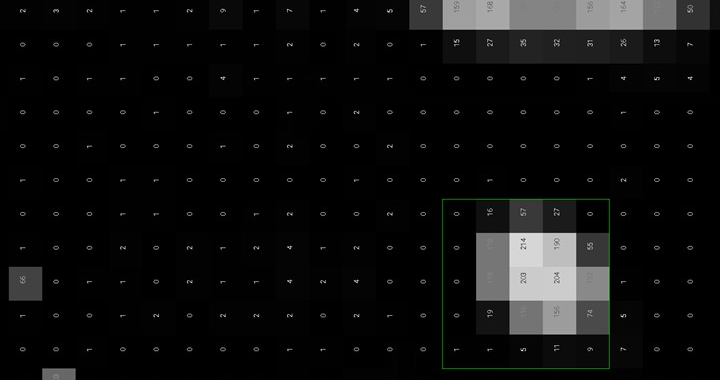
In this post, I describe how these capacitive images can be accessed and used in Android applications to enable students and other researchers/practitioners to easily access the data. In a nutshell, the touch controller measures the change of coupling capacitance between two orthogonal electrodes, i.e. intersections of row and column pairs. These measurements, when visualized as a 2D image, result in a low-resolution finger imprint (see image below). Capacitive touchscreens of commodity smartphones comprise around 400 to 600 electrodes (e.g., 15×27 electrodes with each being 4.1×4.1mm on an LG Nexus 5). The touch controller translates the measurements into a 2D coordinate which is then provided to the operating system.

Setting up the Kernel to access the Capacitive Images
Capacitive images are typically not exposed to the application layer. Thus, we need to modify the Android kernel to do so. In a nutshell, I2C calls are required to access the touch controller’s debug interface. The register for test reporting is described in the RMI4 specification (511-000405-01 Rev.D) and in the driver’s source code. The RainCheck project from the University of Washington provides well-documented instructions to setup the build environment, checkout kernel sources from the CyanogenMod project, access the test registers, and compile it.
Since compiling the a whole Android kernel can be quite time consuming, this post describes how the capacitive images can be accessed with an already compiled kernel for the LG Nexus 5 (the reference device in research literature for accessing the raw data) and a convenient Android library that was developed and revised during my projects. The kernel (as a flashable zip file) and the library are available on the GitHub page of the InfiniTouch project. This kernel was tested with CyanogenMod 12.1 (download build) but should also work on later versions of CyanogenMod.
Installing a custom recovery
After downloading the kernel, it needs to be flashed on a LG Nexus 5 device. In case no appropricate recovery is installed (e.g. TWRP), we need to install it first. To do so, turn on USB Debugging in the Developer Options, connect your device to a computer, and run the following command in a command line/bash. Make sure that the Android Debugging Bridge (ADB) is already installed on your computer. Then, reboot your device into bootloader mode:
adb reboot bootloaderWhen in bootloader mode, check if your device is recognized by fastboot (a tool of the Android SDK which enables to flash images into the internal memory of a mobile device):
fastboot devicesIf your device is properly recognized, the device ID should be shown in the console output. In case not, reboot the device into the bootloader mode again (by selecting said option with the volume button). To unlock your bootloader (this only needs to be done once to flash a custom recovery), use the following command:
fastboot oem unlockDownload the latest image file of the recovery on the TWRP website (twrp-X.X.X-X-hammerhead.img) and flash it as follows:
fastboot flash recovery /path/to/twrp-X.X.X-X-hammerhead.imgIf everything went fine, the console output should display finished. Now select Recovery mode on the device using the volume buttons and confirm with the power button. The custom recovery should be displayed now.
Flashing the Kernel
With the custom recovery being active, the device is accessible via ADB. To push the kernel file (here: CapImg_20fps_Kernel_Nexus5.zip), run the following command:
adb push /path/to/CapImg_20fps_Kernel_Nexus5.zip /sdcard/CapImg_20fps_Kernel_Nexus5.zipThen press Install in TWRP and select the kernel file. Confirm the flashing process and the kernel should be flashed. If flashing was successful, the output log shows a success message. Now restart your device and the capacitive images should be available in the application layer.
Note: Since accessing the capacitive images requires switching between the register for test reporting and the one for the touch coordinates, some touch_up events may get lost which leads to a “laggy” user interface.
Accessing Capacitive Images in Android Apps using LibFTSP
The flashed kernel outputs the capacitive images into a virtual file system (procfs) to make it accessible to the application layer. To test whether it works, open the ADB shell:
adb shelland print the content of the file:
cat /proc/capacitive_matrixIf a bunch of comma-separated numbers appear, the kernel works. With LibFTSP, this data can be easily accessed in an Android application without any low-level code.
Adding the library to an Android project
Download libftsp.jar from the URL above and place it into the libs folder of your Android project. Then open the Module Settings (right-click on the project in the project pane), select the app module, and navigate to the Dependencies tab. Add the library by clicking ‘+’ and selecting “Jar dependency”. After adding the jar, it should look as follows:
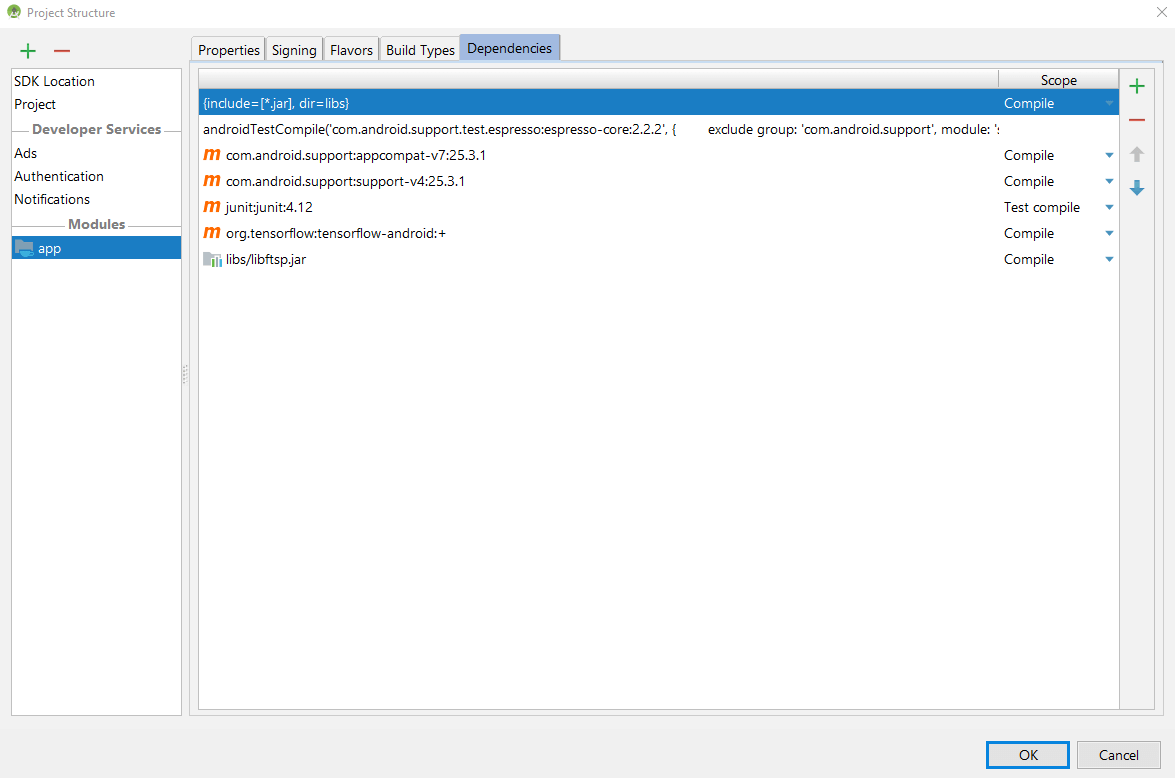
Click OK and the library should be ready to use.
Using LibFTSP on a LG Nexus 5
Accessing the capacitive images is simple and feasible with a few lines of code. LibFTSP provides the capacitive images in a Callback handler as shown below:
The capacitive image as a 2D array can be retrieved with getMatrix() on the CapacitiveImageTS object as shown in line 9. Line 12 returns the capacitive image as a (flattened) 1D array. The nano timestamp of the capacitive image can be retrieved with getTimestamp(). This should be sufficient for developing and evaluating novel types of input techniques based on a low-resolution finger imprint.
Demo applications of the PalmTouch project further show how to visualize the capacitive image, how to apply deep learning models to recognize palms and fingers, and provide some sample use cases.
Accessing Capacitive Images on InfiniTouch
LibFTSP also supports the full-touch smartphone that we developed in the InfiniTouch project. In particular, it provides convenient functions to synchronize capacitive images of the front, back, and edge sensors. Capacitive images of each side can also be retrieved via Callbacks.
The front side of the full-touch smartphone is the receiver of all capacitive images and receives them in the following callbacks:
The back side is one of the sender. Apps made to send the capacitive image can do this in two lines with LibFTSP: